|
CalcMySky
v0.3.1
|
|
CalcMySky
v0.3.1
|
The model generated by calcmysky can be previewed using another utility, showmysky. You can start it and choose the model directory, or pass the directory as a command-line argument.
The window will show the preview with a toolbox, similar to the screenshot below.
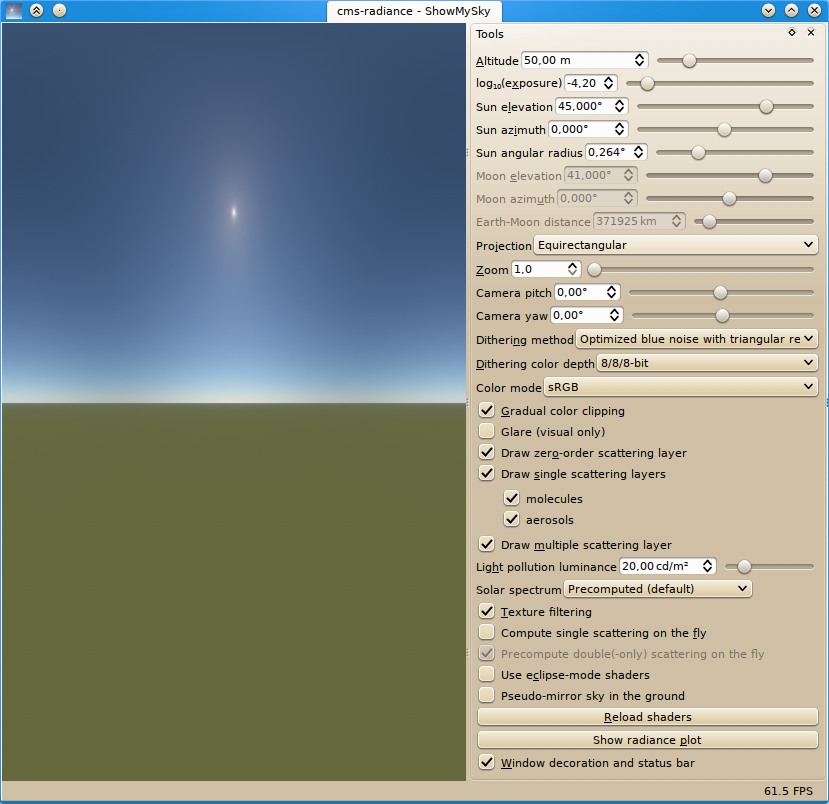
The image displayed in the main part of the window is the scene projected onto the screen in the projection chosen. The top (when zoom, camera pitch and yaw have default values) corresponds to zenith, the bottom to nadir, the sides to the South, and the middle to the North.
Keyboard/mouse actions have the following effects:
Ctrl + drag: move the Sun, affects Sun azimuth and Sun elevation;Shift + drag: change camera orientation, affects Camera pitch and Camera yaw;Shift + drag;This manipulator defines altitude of the camera above the ground.
This manipulator controls brightness of the scene, similar to the exposure setting of a photo camera. The numeric value is a logarithm of the actual brightness factor.
TODO: describe how the radiance in \(\mathrm{cd/m^2}\) gets converted into the final RGB units on the display.
Elevation of the Sun over mathematical horizon.
Azimuth of the Sun, zero being North.
Angular radius of the solar disk. In real life it depends on the distance between the Sun and the camera (and thus on time of year).
Elevation of the Moon over mathematical horizon. It's used the simulation of solar eclipses.
Azimuth of the Moon, zero being North. It's used in the simulation of solar eclipses.
Distance between the centers of the Earth and the Moon. It's used in the simulation of solar eclipses.
This control lets one choose a projection from the following options:
Zoom in factor. This factor increases the size of the image.
Changes the direction of look or the camera by tilting it up or down. The projection remains the same, so the horizon becomes curved.
Changes the direction of look or the camera by rotating it left or right.
The scenes rendered contain wide gradients, often between very close colors. The typical 8 bit per color channel quantization appears too limited in such conditions, which results in banding. To fight it, dithering can be used.
ShowMySky previewer supports two dithering methods:
dither_BlueTriang GLSL function defined inside GLWidget::initializeGL and the comment at the top of ShowMySky/BlueNoiseTriangleRemapped.hpp).Dithering algorithm has to make some assumptions about the display device. Often, even the operating system of the computer can't tell what color depth a monitor has. This option lets the user set the correct color depth (or try them and choose the best).
The options are named as R/G/B where R, G, and B are number of bits in corresponding RGB channel. Here's the list of options:
This control lets one analyze image colors by looking at the following representations them:
This option makes the colors too bright to display smoothly saturate in brightness instead of abruptly clamping at maximum value. This makes gradients that change from displayable colors into very bright colors nicer. The plot below shows the comparison of the simple clamping and gradual clipping as brightness of a given color #fcb55c increases.
Below are two examples of the same scene, one with gradual color clipping turned off, and another with it turned on.


Real-life optical systems (including human eyes) never map a single cone of view to a single pixel. Instead, each pixel samples the whole field of view of the camera with varying weights, and the direction that it's supposed to display has a sharp peak in the weight function. On the one hand, this leads to starburst effect, blur, and other aberrations. On the other hand, it lets one see the colors of bright sources of light that would otherwise be seen as simply white points.
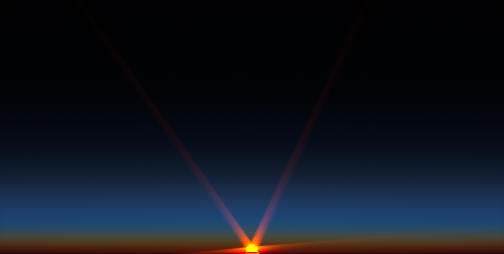
The Glare checkbox enables a simplistic simulation of glare in the scene, letting one perceive brightness and color of the Sun, whose disk is almost always overexposed. In particular, we can see how the solar disk becomes bluish (which is invisible without glare) during sunrise watched through the ozone layer, as shown below.
Zero-order scattering layer contains radiance from the Sun and from the ground. Technically, the ground doesn't emit visible light on its own, it just scatters the sunlight, but the way the simulation is organized puts it into the zero-order layer. Such separation is also useful for applications such as Stellarium, which renders both the Sun and the ground with its own means.
Single scattering layers contain radiance from first-order scattering on the constituents of the atmosphere. This radiance is stored in separate textures, and is only controlled by this checkbox if the values haven't been merged into multiple scattering texture (see phase function type parameter in atmosphere description file).
This option has sub-options corresponding to each separate single scattering layer. This lets one check how much light is scattered by each of these constituents. But note that enabling or disabling these sub-options only affects incoming radiance, it doesn't affect transmittance of the atmosphere. Enabling or disabling these layers is not the same as enabling or disabling a constituent of the atmosphere.
This layer contains radiance from scattering orders higher than 1, and additionally the first-order scattering by the species whose phase function was marked as smooth (see phase function type parameter in atmosphere description file).
Luminance of the ground that results in light pollution. Set to zero to remove light pollution from the scene.
When the model has radiance textures (see --radiance option for calcmysky), this setting lets one replace the solar spectrum with another. The options are:
solar irradiance at TOA in the atmosphere description file;This is a debugging option. Normally all the textures are linearly interpolated when sampling. If this option is disabled, zero-order interpolation is used.
Compute first-order scattering radiance of each pixel on the fly instead of using precomputed textures. Increases quality, but reduces performance.
This option is only used with eclipse shaders. It's only available when double scattering textures are available (see --no-eds-tex option for calcmysky).
When this option is enabled, double scattering is computed on the fly instead of using precomputed textures. If the textures are not available, it's always enabled.
Normal sky, when the Moon doesn't block the Sun, can be rendered using much more performant shaders and with higher quality (i.e. including third- and higher-order scattering radiance). But when the Moon does block the Sun, we have to resort to a more general model, which takes into account relative positions of the Sun and the Moon and simulates solar eclipse. This model only supports first- and second-order scattering, because it's a very expensive computation.
This option lets one use the shaders that can simulate eclipse instead of the default ones that work with normal sky.
Some applications like Stellarium (for which this project was initially created) don't want to display ground in any way, and instead they show the sky colors there.
This option enables a kind of mirror image of the sky instead of the ground (it isn't physically a simulation of a mirror).
This is a debugging command. It reloads all textures in the current model. Useful with --no-save-tex option of calcmysky.
When the model has radiance textures (see --radiance option for calcmysky), this command opens (or brings to the front) the window that shows a plot of spectral radiance.
This window lets one examine simulated spectral radiance of any pixel in the scene. Just click the interesting pixel after opening the Spectral radiance window to see the spectral radiance.
In addition, luminance computed from this spectrum is displayed in the top-right corner of the Spectral radiance window.
Sometimes it's useful to have a bare window, without any controls, just an image. For example, when comparing the rendering with a photograph. Tools widget can be simply undocked, while status bar and window decoration (i.e. borders and title bar) need some way to be hidden. This option lets the user hide this GUI frame.
 1.8.15